DIY metal detector - diagrams, drawings, step-by-step production. Homemade metal detectors: simple and more complex - for gold, ferrous metal, for construction Do-it-yourself lactation metal detector
As a child, did you want to have a device that could be used to find metal objects and even treasure? Most children want to have such a unit. Fortunately, it exists. This is a conventional metal detector that allows you to detect various metals under a layer of soil and in other places. The principle is that it finds a material that differs in its magnetic or electrical properties from its environment. It is noteworthy that you can find not only metal objects and not only in the ground.
The metal detector is used by geologists, security services, the military, criminologists and construction workers. This is a very useful thing in the household. Is it possible to make a metal detector with your own hands? Yes, and this article will help you with this.
How does a metal detector work and what does it consist of?
In order to make such a device at home with your own hands, you need to understand the principle of its operation. How is it able to detect metal and signal it? It's all about electromagnetic induction. Metal detectors have their own circuit, consisting of:
- Transmitter of electromagnetic wave oscillations.
- Receiver.
- A special signal transmitting coil.
- Coil that receives the signal.
- Display devices.
- Discriminator (useful signal selection circuit).
Some operating units can be combined schematically and structurally. For example, both the receiver and the transmitter can operate on the same coil. Part of the receiver will immediately emit a positive signal and so on.
Now let’s take a closer look at the operating principle of the metal detector. Thanks to the coil, an EMF (electromagnetic field) of a certain structure begins to be created in the medium. In the case when an object that conducts electricity is within the range of this field, Foucault or eddy currents appear in it. They create the object’s own EMF. Now the original structure of the coil begins to become distorted. And when an object located in the ground does not conduct electricity, but has ferromagnetic properties, then due to shielding, the structure of the coil is also distorted. In both the first and second cases, the metal detector picks up the electromagnetic field from the object and converts it into a signal (acoustic or optical). You hear a certain sound and can see the signal on the screen.

Note! In general, for a metal detector to work, it is not necessary that the body conduct current; the ground does not. It is important that the magnetic and electrical properties of bodies differ.
This is how a metal detector system works. The principle is simple and effective. Now, let's take a closer look at how to make a metal detector with your own hands. The first thing you need is to prepare all the tools and materials.
Metal detector components
So, if you want to make a device, then you cannot do without special devices. This is still an electronic device that needs to be assembled from various components. What will be required? The set is as follows:

You can see other components in the diagram below.
Additionally, you will need a plastic box to mount the electronic circuit. Also prepare a plastic pipe to create a rod with a coil attached to it. Now you can get to work.
Assembling a metal detector with your own hands: creating a printed circuit board
The most difficult stage of work is the electronics. Everything here is subtle and complex. Therefore, it is rational to start with creating a working printed circuit board. There are only a few options for different boards. It all depends on the radioelements used to create it. There are boards operating on the NE555 chip and on transistors. Below you can see what these boards look like.
We assemble a metal detector with our own hands: installing electronic elements on the board
Further work will also not be easy. All electronic elements of the metal detector will have to be soldered and installed as shown in the diagram. In the photo you can see the capacitors. They are film-like and have high thermal stability. Due to them, the operation of the metal detector will be much more stable. This indicator is very useful, especially during the autumn period of using the device. After all, it gets quite cool outside then.
All that remains is to do the soldering. We will not describe the process itself, since the soldering technology should be known to everyone. To clearly understand how to perform all the work on the electronic part of the metal detector, we suggest that you additionally familiarize yourself with this video:
Assembling a metal detector with your own hands: power supply
In order for the device to receive current, you need to provide a power source of 9-12 V. It is worth noting that the metal detector consumes electricity quite voraciously. This is not surprising, since the device is quite powerful. If you think that one “Krona” (battery) will be enough, then this is not so. He won't work for long. You will need two or even three batteries connected in parallel. Alternatively, use one powerful battery. It will be cheaper since it can take a long time to discharge and charge.

Assembling a metal detector with your own hands: coil
Since we are making a pulsed metal detector, careful and precise assembly of the coil is not required. The normal diameter of the coil will be 19-20 cm. To do this, you will have to wind 25 turns. Once you have made the coil, wrap the top well with insulating tape. To increase the depth of detection of objects by the coil, wind the diameter of the send about 26-27 cm. In this case, you need to reduce the number of turns to 21-23. In this case, a wire Ø 0.5 mm is used.
Once you have wound the coil, you will need to mount it on the hard body of the metal detector. It is important that there is no metal on the body. Think and look for any case that will fit in size. The housing will perform a protective function. The coil will be protected from impacts on the ground during searches.
To make a tap from the coil, solder two wires Ø 0.5-0.75 mm to it. It is recommended to use 2 wires twisted together.
Assembling a metal detector with your own hands: setting up the device
When assembling a metal detector according to the diagram, you do not need to configure it. It already has maximum sensitivity. To fine-tune the metal detector, adjust the variable resistor R13 by twisting it slightly. Do this until you hear occasional clicks. In the case when this is achieved at the extreme position of the resistor, change the rating of the R12 device. Such a variable resistor should configure the metal detector to operate optimally in the middle position.

There is a special oscilloscope that allows you to measure the gate frequency of resistor T2. The pulse length should be 130-150 μs, and the optimal operating frequency should be 120-150 Hz.
To start the metal detector search process, you need to turn it on and wait about 20 seconds. Then it will stabilize. Now twist resistor R13 to adjust it. That's all, you can start your search using a simple metal detector.
Let's sum it up
Such detailed instructions will help you learn how to make a metal detector yourself. It is simple but fully capable of finding metal objects. More complex models of metal detectors require more effort and time.
Not so often, but losses still happen in our lives. For example, we went into the forest to pick mushrooms and berries and dropped the keys. It will not be so easy to find them in the grass under the leaves. Don’t despair: a homemade metal detector, which we will make with our own hands, will help us. So I decided to collect my first metal detector. Nowadays, few people decide to make a metal detector. Homemade devices were popular twenty to twenty-five years ago, when there was simply nowhere to buy them.
Modern metal detectors from manufacturers such as Garrett, Fisher and many others have high sensitivity, metal discrimination, and some even have a hodograph. They are able to adjust the ground balance and tune out electrical interference. Thanks to this, the detection depth of a modern coin metal detector reaches 40 cm.
I chose a scheme that was not very complicated, so that it could be repeated at home. The principle of operation is based on the difference in the beat of two frequencies that we will pick up by ear. The device is assembled on two microcircuits, contains a minimum of parts, and at the same time has quartz frequency stabilization, thanks to which the device operates stably.
Metal detector circuit on microcircuits

The scheme is very simple. It can easily be repeated at home. It is built on two 176 series microcircuits. The reference oscillator is made on La9 and stabilized by quartz at 1 MHz. Unfortunately, I didn’t have this, I had to set it to 1.6 MHz.
The tunable generator is assembled on the K176la7 microcircuit. To achieve zero beats, varicap D1 will help, the capacity of which varies depending on the position of the variable resistor R2 slider. The basis of the oscillatory circuit is the search coil L1, when it approaches a metal object, the inductance changes, as a result of which the frequency of the tunable generator changes, which is what we hear in headphones.
I use regular headphones from a player, the emitters of which are connected in series in order to put less load on the output stage of the microcircuit:

If the volume turns out to be too much, you can introduce a volume regulator into the circuit:

Details of a homemade metal detector:
- Microcircuits; K176LA7, K176LA9
- Quartz resonator; 1 MHz
- Varicap; D901E
- Resistors; 150k-3pcs., 30k-1pc.
- Variable resistance resistor; 10k-1pcs.
- Electrolytic capacitor; 50 microfarads/15 volts
- Capacitors; 0.047-2pcs., 100-4pcs., 0.022, 4700, 390
Most of the parts are located on the printed circuit board:


I placed the entire device in an ordinary soap dish, shielding it from interference with aluminum foil, which I connected to a common wire:

Since there is no place on the printed circuit board for quartz, it is located separately. For convenience, I removed the headphone jack and frequency control from the end of the soap dish:

The entire metal detector unit was placed on a piece of ski pole using two clamps:

The most important part remains: making the search coil.
Metal detector coil
The sensitivity of the device and resistance to false alarms, the so-called fontons, will depend on the quality of the coil’s manufacturing. I would like to immediately note that the depth of detection of an object directly depends on the size of the coil. So, the larger the diameter, the deeper the device will be able to detect the target, but the size of this target should also be larger, for example, a sewer manhole (the metal detector simply will not see a small object with a large coil). Conversely, a small-diameter coil can detect a small object, but not very deep (for example, a small coin or ring).
Therefore, I first wound a medium-sized reel, so to speak, a universal one. Looking ahead, I want to say that the metal detector was designed for all occasions, that is, the coils should be of different diameters and they can be changed. To quickly change the coil, I installed a connector on the rod that I pulled out of an old tube TV:

I attached the mating part of the connector to the coil:

As a frame for the future reel, I used a plastic bucket that I bought at a hardware store. The diameter of the bucket should be approximately 200 mm. Part of the handle and bottom should be cut off from the bucket so that a plastic rim remains, onto which 50 turns of PELSHO wire with a diameter of 0.27 millimeters should be wound. The connector should be attached to the part of the remaining handle. We insulate the resulting coil using electrical tape in one layer. Then we need to shield this coil from interference. To do this, we need aluminum foil in the form of a strip, which we will wrap on top so that the ends of the resulting screen do not close and the distance between them is approximately 20 millimeters. The resulting screen should be connected to a common wire. I also wrapped it with electrical tape on top. Of course, you can soak it all with epoxy glue, but I left it that way.
After testing a large coil, I realized that I needed to make a small one, the so-called sniper, to make it easier to detect small objects.

The finished coils look like this:

Setting up a finished metal detector
Before you start setting up your metal detector, you need to make sure that there are no metal objects near the search coil. The setup consists of selecting the capacitance of capacitor C2 in order to obtain the maximum level of beats that we hear in headphones, since there are many harmonics in the signal (we need to highlight the strongest one). In this case, the slider of the variable resistor R2 should be as close to the middle as possible:

I made the rod from two parts, the tubes were selected in such a way that they fit into each other very tightly, so I didn’t have to come up with a special fastening for these tubes. An armrest and handle were also made to make it easier to wire above the ground. As practice has shown, this is very convenient: the hand does not get tired at all. When disassembled, the metal detector turned out to be very compact and literally fits into a bag:

The appearance of the finished device looks like this:

In conclusion, I would like to say that this metal detector is not suitable for people who are going to work in the old-fashioned way. Since it doesn't discriminate against metals, you'll have to dig for everything. You will most likely be very disappointed. But for those who like to collect scrap metal, this device will be of help. And just as entertainment for children.
Metal detector circuit
Today I would like to present to your attention a diagram of a metal detector, and everything related to it, what you see in the photograph. After all, it is sometimes so difficult to find the answer to a question in a search engine - Diagram of a good metal detector
In other words, the metal detector has a name Tesoro Eldorado
The metal detector can operate in both the search mode for all metals and background discrimination.
Technical characteristics of the metal detector.
Operating principle: induction balanced
-Operating frequency, kHz 8-10kHz
-Dynamic operating mode
-Precise detection mode (Pin-Point) is available in static mode
-Power supply, V 12
-There is a sensitivity level regulator
-There is a threshold tone control
-Ground adjustment is available (manual)
Detection depth in the air with a DD-250mm sensor In the ground, the device sees targets almost the same as in the air.
-coins 25mm - about 30cm
-gold ring - 25cm
-helmet 100-120cm
-maximum depth 150cm
-Consumption current:
-Without sound approximately 30 ma
And the most important and intriguing thing is the diagram of the device itself

The picture is easily enlarged when you click on it
To assemble the metal detector you need the following parts:
 So that you do not have to spend a long time setting up the device, do the assembly and soldering carefully; the board should not contain any clamps.
For tinning boards, it is best to use rosin in alcohol; after tinning the tracks, do not forget to wipe the tracks with alcohol
Parts side board


We begin assembly soldering jumpers, then resistors, further sockets for microcircuits And all the rest. One more small recommendation, now regarding the manufacture of the device board. It is very desirable to have a tester that can measure the capacitance of capacitors. The fact is that the device These are two identical amplification channels, therefore the amplification through them should be as identical as possible, and for this it is advisable to select those parts that are repeated on each amplification stage so that they have the most identical parameters as measured by the tester (that is, what are the readings in a particular stage on one channel - the same readings on the same stage and in another channel)
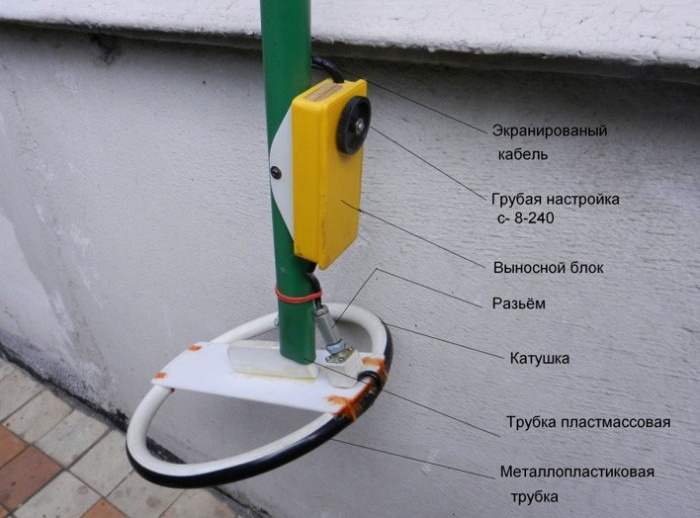
Making a coil for a metal detector
 Today I would like to talk about the manufacture of a sensor in a finished housing, so the photo is more than words.
We take the housing, attach the sealed wire in the right place and install the cable, ring the cable and mark the ends.
Next we wind the coils. The DD sensor is manufactured according to the same principle as for all balancers, so I will focus only on the required parameters.
TX – transmitting coil 100 turns 0.27 RX – receiving coil 106 turns 0.27 enameled winding wire.
After winding, the coils are tightly wrapped with thread and impregnated with varnish.

After drying, wrap tightly with electrical tape around the entire circumference. The top is shielded with foil; between the end and the beginning of the foil there should be a gap of 1 cm not covered by it, in order to avoid a short-circuited turn.
It is possible to shield the coil with graphite; to do this, mix graphite with nitro varnish 1:1 and cover the top with a uniform layer of tinned copper 0.4 wire wound on the coil (without gaps), connect the wire to the cable shield.
We put it into the case, connect it and roughly bring the coils into balance, there should be a double beep for the ferrite, a single beep for the coin, if it’s the other way around, then we swap the terminals of the receiving winding. Each of the coils is adjusted in frequency separately; there should be no metal objects nearby!!! The coils are tuned with an attachment for measuring resonance. We connect the attachment to the Eldorado board in parallel with the transmitting coil and measure the frequency, then with the RX coil and a selected capacitor we achieve a frequency 600 Hz higher than that obtained in TX.
After selecting the resonance, we assemble the coil together and check whether the device sees the entire VDI scale from aluminum foil to copper; if the device does not see the entire scale, then we select the capacitance of the resonant capacitor in the RX circuit in steps of 0.5-1 nf in one direction or another, and in addition the moment when the device will see foil and copper at a minimum of discrimination, and when the discrimination is turned up, the entire scale will be cut out in turn.

We finally reduce the coils to zero, fixing everything with hot glue. Next, to lighten the coil, we glue the voids with pieces of polystyrene foam, the foam sits on the hot glue, otherwise it will float up after filling the coil.
Pour the first layer of epoxy, without adding to the top 2-3mm

Fill in the second layer of resin with color. An aniline dye is a good choice for dyeing fabric; the powder comes in different colors and costs a penny. The dye must first be mixed with the hardener, then the hardener must be added to the resin; the dye will not dissolve in the resin immediately.
To assemble the board correctly, start by checking the correct power supply to all components.
Take the circuit and the tester, turn on the power on the board, and, checking the circuit, go through the tester at all points on the nodes where power should be supplied.
When the discrimination knob is set to minimum, the device should see all non-ferrous metals
, when screwing the discrim, they should be cut out
all metals in order up to copper should not be cut out if the deviceit works this way, which means it is configured correctly. The discrimination scale needs to be selected so that it fits completely into a full turn of the discrimination knob, this is done by selecting c10. When the capacity decreases, the scale stretches and vice versa.
Nowadays, many people try not to buy metal detectors, but to assemble them with their own hands. As a rule, it is believed that something made by hand is much worse than branded items. Practice has shown that a high-quality product can compete with metal detectors made in production.
It goes without saying that such a device may look a little worse in terms of aesthetics, but in terms of technical data, it will be competitive.
General information on metal detectors
Before you start build your own metal detector, you need to find out the principles of its operation and what types such equipment can be divided into.
Design
Metal detectors are mainly divided into five types. They differ in search depth and type of metal. They have a variety of functions that simplify the work, but still, even with such differences, some similar features can be identified.

Principle of operation
 The structure of a metal detector system may seem complicated only at first glance. In fact, the whole process is simply the attraction of metal products using a magnetized coil. While the coil begins to attract metal parts, magnetic waves pass through it, and after that a signal is heard.
It is worth noting that the coils operate at low or high frequencies. If the equipment operates at low frequencies, then metal products will mainly be found only at a depth of four meters. In addition, a metal detector that operates at low frequencies can only detect large samples, while small metal parts on the surface will go undetected. A metal detector that reacts at high frequencies, on the contrary, finds only small details on the surface, but cannot work at a depth of more than two meters and search for large objects.
Type varieties
Metal detectors can be divided into 5 types, taking into account the device that is responsible for transmitting and receiving the signal.

How to make a metal detector with your own hands?
Making your own homemade metal detector is not too difficult, even if you do not have certain skills in electrical engineering and the system itself. Today there are quite a large number of metal detectors that can be assembled at home. They differ in the circuits that have to be used to create the control unit, materials and complexity of assembly.
As a rule, the most complex metal detector is assembled according to a scheme where it is necessary to install two generators into the system structure at once. This is quite difficult for a beginner. There is also a simpler type of metal detector that can be easily made at home, using only available materials.
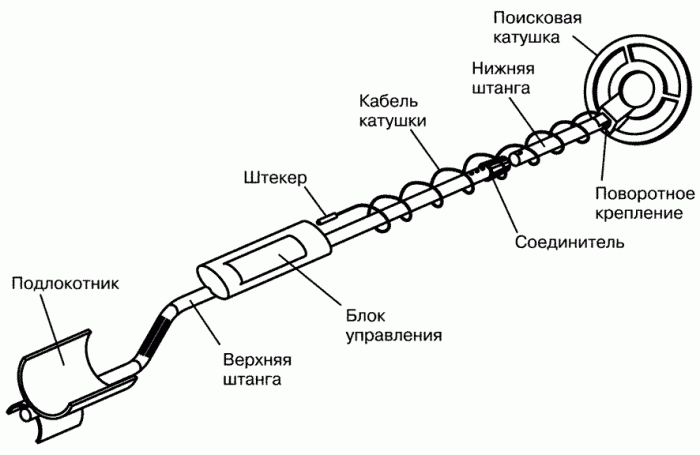
Frame
 The assembly of a homemade metal detector must begin with the development of the housing. It should be a simple barbell that can be welded or connected with fasteners. In fact, there are no defined frames for the case. Here, each person can make a barbell for themselves, but it is important to remember some factors.
First of all, the material that is selected for the manufacture of the case must be strong enough to withstand the weight of an adult for a long time. In addition, we must not forget about the size of such a bar, because if you choose the wrong length for your height, each time you search for metal objects you will have to stand in a bent state for several minutes.
Many people simplify the task of creating a body by using a simple crutch, which also has an armrest. A crutch can be easily selected to suit your height, and it is not too expensive.
Search coil
Making a homemade search coil is quite difficult, but it is possible. The first step is to start creating a device for winding the coil. First you need to take a simple board measuring 18 by 18, nails and cambric.
After this, you need to draw an even circle on the board and drive at least 16 nails along its diameter, so that they protrude slightly by about 2 cm. After this, cambrics are installed on the nails, which are tightly wrapped with copper wire. At the end of the work, the entire copper circle is firmly secured with threads, which need to be wound around the entire diameter and treated with epoxy resin.
You need to leave a 4 cm long lead, tighten the coil with electrical tape and shield it with foil. The copper wire needs to be tinned to a length of 1.25 cm and then re-wind it onto the reel. Then the action is repeated, or, more precisely, the coil is wrapped with electrical tape. You will also need to solder a contact pad to the coil terminal.
Control block
To create a control unit you will need:

All the necessary parts can be found in an old transistor type receiver. To assemble the control unit, you will need to find a suitable housing and install all the parts.
The circuit and coil are connected together using shielded wire. The cable screen is soldered to the coil terminal, insulation is installed, and the cable is fixed to the housing using electrical tape.
Conclusion
Making an entry-level metal detector is quite simple at home using available tools. All you need to do is follow the instructions and diagrams for assembling the equipment. The result is a model that can be used to search for small metal objects at a depth of up to 1 m.
This is almost akin to searching for treasures. Some are stopped by the fact that they live far from mountains or rivers in order to look for nuggets by washing sand. Others do not understand radio components to know how to extract gold from them. Still others prefer to look for precious metal using a metal detector, but do not have the funds to buy it. Fortunately, the device is quite simple, and even without being a radio amateur, you can make it yourself.
Operating principle
What is a metal detector? This is a device that, using certain radiation, finds metal located underground, without direct contact with it. The response data that comes back helps to identify the find and informs about it using an audio or visual signal.
The principle of operation of the metal detector
The electromagnetic field that the device emits comes into contact with metals, in this case gold, which provokes the appearance of eddy currents on their surface. By measuring electrical conductivity, metals are identified and data about this is transmitted by a signal.
Metal detectors can have different wave parameters, return signal processing techniques, additional functions and much more. Therefore, before you start making a device, you need to decide what exactly you want to get as a result.
The standard frequency for metal detectors is 6–20 kHz, but for gold it should be slightly higher, 14–20 kHz or more. This is because gold often occurs in tiny nuggets, so higher sensitivity is needed. If there is such a possibility, then it is good to have a device with a multi-frequency customizable search, then it will be possible to increase the number of objects that it recognizes.
Among all the metal detector circuits on the Internet, experts advise choosing devices with balanced induction, which have two coils in the head and a powerful electronic circuit. Also of great interest are circuits that have a receiver-transmitter operating principle, operating at high frequencies, about 20 kHz, which makes it possible to distinguish non-ferrous metals from ferrous ones.
Common parameters
Various technical methods can be used to design a metal detector. Much depends on the conditions in which it will be used. Therefore, the idea of what requirements the device must meet must be defined as clearly as possible. The following device parameters are distinguished:
- sensitivity - a characteristic that determines how small objects the detector can detect;
- selectivity - the ability to identify metals and react to specific ones;
- resistance to interference - the ability not to respond to extraneous radio signals from radio stations, cars, lightning strikes and others;
- energy consumption - how much the device consumes and how long the built-in battery or batteries last;
- penetrating power - the depth at which the device can recognize metals;
- dimensions of the device;
- search area size - the area covered by the device without changing its location.
Resolution is the main parameter, in turn, it is also a composite one. There are one or two signals at the output of the device, and there are more properties that determine the object and its location. For example, if you lower the frequency of the generator, you can achieve an increase in the search and penetration area, but lose in sensitivity, as well as mobility due to the increase in the size of the coil.
 Diagram of a simple metal detector
 The peculiarity of the design of the metal detector is that all of the above parameters, in combination or individually, depend specifically on the frequency of the coil. Thus, this characteristic is decisive when designing the device. By frequency, metal detectors are divided into the following:
- ultra-low frequency: frequency up to several hundred hertz, low mobility, high power consumption, complex in design and signal processing;
- low-frequency: hundreds, thousands of Hz, low sensitivity, high noise immunity, simple design, permeability depends on power - from 1 to 4 m, mobile;
- high frequency: tens of kHz, simple design, permeability up to 1.5 m, poor noise immunity, so-so discrimination, good sensitivity;
- high-frequency: radio frequencies, typical “gold”, excellent discrimination, small permeability, up to 80 cm, low consumption, other parameters are poor.
Device design
The device, which does not require absolutely any knowledge in radio engineering, can be assembled with your own hands, having: a calculator, a radio receiver, a box with a hinged lid made of plastic or cardboard, and double-sided tape. The calculator must be as cheap as possible to serve as a basis for radio interference, and the receiver must not be immune to interference.
DIY metal detector, instructions:
- We unfold the box, forming it into a book.
- We fix the calculator and receiver in the box, the latter in the lid.
- Turn on the receiver and look for a free area at the top of the AM band.
- Turn on the calculator: the receiver should make a sound, set it to maximum volume.
- If there is no tone, we adjust until it appears.
- Fold the lid so that the tone disappears. In this position, the magnetic vector of the primary pulses will be perpendicular to the axis of the magnetic antenna rod.
- We fix the cover.
Thus, it is quite simple to assemble a primitive device, but in order to obtain more data, you already need to have some knowledge and skills in radio electronics. On the Internet you can find a suitable one from many schemes.