How to cover the walls of a canopy in the yard. Beautiful do-it-yourself canopies in the courtyard of a private house
In order not to get wet in the rain and not languish in the sun while you open the front doors, you need some kind of protection. Usually they make a canopy over the porch or just over the door. In some cases, the canopy may also cover steps and even a path or part of it. How to make such a structure, from what materials we’ll talk further.
Species and types
If we talk about the structure as a whole, the canopy or canopy over the porch consists of a frame and roofing material (cladding). There may also be support posts that support the outer edge of the canopy. They are an optional element. They are needed when there is no confidence that the structure without additional supports will be able to retain precipitation.
Precipitation generally means snow. In regions with a lot of snow, you can either make the slope of the canopy steep so that the snow melts quickly, or install additional supports. You can do both, as is usually done - the margin of reliability/strength reassures and instills confidence.
Frame and stand materials
The frame and supports of the canopy over the front door are made from:

The most popular material recently for making the frame of a canopy over a porch is profiled pipe. With equal dimensions and wall thickness with a round pipe (if we compare the diagonal and diameter), the profile has greater rigidity. At the same time, it comes in a variety of sections - a square and a rectangle with different sides, it can be bent into arcs, it is easier to weld and attach to walls, it goes well with elements of traditional or cold forging, and its durability is the same as other steel products. In general, it is the profiled pipe that is in favor today.
What is the lining of the canopy over the porch made of?
If we talk about materials for cladding the canopy over the porch, there is a very wide choice. Very often the canopy over the entrance to the house is made of the same material as the roof. And this is correct, since in this case the result is a harmonious design of the house. With this solution, any roofing material is used:
The second option is to use the material that is used in the fence. In this case, both the design style and decorative elements should be recognizable. This will create a single ensemble with the site. Here the materials can be like this:
- slate (usually flat, but not a fact);
- corrugated sheeting;
- polycarbonate;
- wooden plank.
And the third option for designing a canopy over the porch is to install a canopy that is “neutral” in style and material. This may include:
Glass is used less often. It is necessary to use reinforced types such as triplex, and not only are they expensive, they also weigh heavily, so additional suspensions or powerful support columns are definitely required. And if you consider that sheet polycarbonate or plastic is not much different in appearance from glass, it becomes clear why glass is unpopular.
Shapes of canopies
There are more than a dozen forms of canopies over the front door. The easiest one to make is a lean-to canopy. Requires a minimum of effort and materials, and can look very good. The downside is that when the snow melts, a snowdrift will end up in front of your door and will urgently need to be removed. Other models with slopes tilted forward suffer from the same “disease”. These are excellent options for regions with little snow in winters, but with hot sun - not quite for our latitudes. Although, if you are not afraid of the need for urgent snow removal, you can do any of the options.

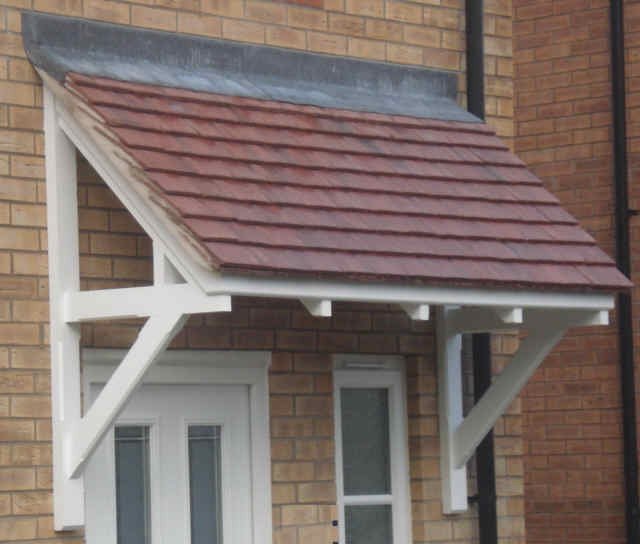
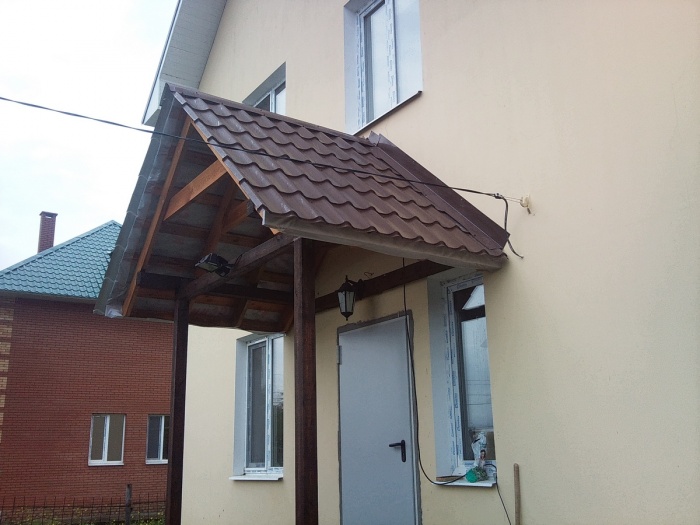
It’s a little more difficult to make a gable canopy (this is the house) and a simple arch. They are good because the melted snow ends up on the sides of the entrance and, even if there is a large amount of it, there is no need to urgently remove it. So for regions with a lot of snow, these are the best models.
How to connect the canopy over the porch and the wall of the house
One of the most difficult moments is to join the covering of the canopy over the porch so that water does not flow down the wall. Usually, standard methods of joining the roof are used - using a bumper strip. This method is suitable for any roofing material, as well as sheet metal and wood. You just need to choose the right color. There are two approaches: matching the wall or matching the roof covering of the canopy. The options are equal, so it’s up to you to decide/choose.

A groove (5-7 mm deep) is made under the fender strip in the wall. The edge of the plank is inserted into the recess, secured, and the seam is sealed with moisture-resistant sealant for external use. The other edge of the strip rests on the roofing material. When water runs down the wall, it flows onto the plank, from it, bypassing the joint, onto the roofing material and further into or directly onto the ground - depending on how it’s done.
If you use metal tiles, sellers have a special wall profile. It can also be used with other materials - it is important to choose the color. The standard unit includes rubber seals, which are placed a couple of centimeters from the outer edge. In this case, during strong winds, water and debris do not fall under the bar.

If the canopy over the front door and porch is made of polycarbonate, glass or sheet plastic, the method described above is unacceptable - it looks too rough. In this case there are two options:

There are no other good options. You can only combine both proposed ones for reliability.
How to fix if the wall is multi-layered
Recently, more and more buildings have multi-layered external walls - ventilated facades, insulation... The load-bearing part of the wall turns out to be covered with a couple of layers of materials, the load-bearing capacity of which is only enough to hold its own weight. You won't be able to attach anything to them. The entire load must fall on the load-bearing wall.

Even if the outer layer is a finishing brick, it costs nothing to attach to it. Masonry is usually carried out in half a brick. So it only looks durable on the outside. Even the smallest and lightest canopy cannot support the weight, and the supporting columns do not help either.
Therefore, with any multi-layer wall, holes are made in all finishing/insulating layers, and the structural elements are attached to the load-bearing wall.
Single-pitch canopy: design features
An inclined or straight single-pitched canopy is the simplest thing that can be. We rarely see straight ones - they are not very functional, but there are quite a lot of single-slope inclined ones.
The inclined single-pitch canopy is based on a right-angled triangle. A right angle is adjacent to the wall, and the length of the sides depends on the desired slope.

In the simplest case, you can weld three identical triangles from a profiled pipe (as in the figure above), make holes in them for fasteners (at least three). These three elements can be combined into a single whole using sheathing for roofing material - as in the figure. Or you can weld cross members from the same pipe (but of a smaller cross-section) or a strip or corner. This option - with metal jumpers - is more suitable for a canopy over a porch made of polycarbonate or plastic. It is also good for metal sheets - it will be convenient to weld it or screw in self-tapping screws.

There is also an option with a variable tilt angle. This is a rectangular frame with sheathing lintels to which lightweight roofing material is attached. This frame is attached above the entrance using a wall beam fixed to the wall (we described how to make the connection above).

Depending on the required angle of inclination, struts are made. They can be made of metal or wood. Fixed to the frame.
If desired, this option can be made with an adjustable tilt angle. Make the fastening of the frame and struts to the wall movable (on hinges, for example), make several holes in the frame. By rearranging the struts into different holes, you can get a different angle of inclination. This feature is not very relevant for doors - except for glass ones - to block out too bright sun, but for windows it can be useful.
Gable canopy frame
There are at least two ways to assemble a canopy with two slopes: from two or more (depending on the length of the canopy) triangular rafters or from two rectangular frames with sheathing, secured with crossbars. The second option is shown in the figure below, and the first will be a little further.

A canopy with a house is one of the popular options
Method one
Two quadrangles are assembled from a timber or thick board, which are united by a ridge board. The angle of inclination of the slopes is set by cuts on the ridge, fixed by crossbars - a spacer bar. Since the roofing material is laid from the ridge down, the sheathing strips are laid in the opposite direction. A continuous flooring is required under soft tiles. It can be moisture-resistant plywood or.

Also, brackets are assembled on the ground - stops that will transfer the load from the canopy to a large area of the wall. It is better to assemble the structure on the ground (without fastening the roofing material). In order to lift and secure the canopy, assistants or the services of a manipulator will be required.
Method two
The second option is the assembly of individual rafter structures. Maybe this option will seem easier to you - all gable roofs are assembled according to this principle.

Here, too, a frame is assembled from timber and brackets are needed. But the frame lies in a horizontal plane, supported by brackets. Two or three triangles are assembled from rafters, which rest on a ridge beam, and it rests on a post, the other end of which is fixed to the frame. It turns out a mini-model of a conventional rafter system.
To improve the appearance, bevels are placed near the counter. In the photo above they are curved, but this is far from necessary. You can simply make it from timber, sawing it at the desired angle. It is also better to assemble the system on the ground - it will not be possible to connect it smoothly at a height.
Made of metal
If the canopy frame is made of a metal pipe, everything is much simpler. The pipe has a high load-bearing capacity, so there are much fewer supporting and auxiliary elements.
Two identical triangles are cooked - according to the size of the future canopy. They are connected by jumpers, the length of which is determined by the “depth” of the visor. To prevent the cladding from bending, additional crossbars are welded.

The finished canopy structure is complemented by brackets - stops. In the picture above, the canopy over the porch has only a stop without slopes. For regions with little snow in winter, this is enough, but to hold a significant mass of snow, you will need a mow or stand. Or maybe both (as in the diagram below).

Decorative elements are an optional part. There may be an ordinary triangle here.
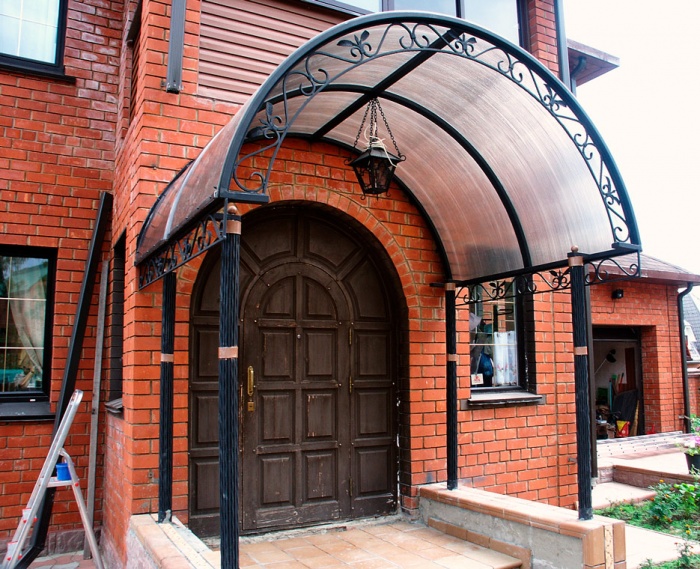
Arched canopy over the porch: manufacturing features
A canopy over the front door in the form of an arch cannot be called difficult to manufacture. It is more convenient to make this shape from a steel pipe, and from a profile, rectangular section. Using (you can do it manually, but it’s more difficult) you make several arches of the same size. They are connected by jumpers, the length of which is determined by the desired size of the roofing part.

Arched design is the simplest option
The first and last arches are connected by horizontal jumpers, brackets or, as in the figure above, ordinary stops are welded to the last one.
You can often see double arches with decorative and not very decorative filling. They are typical for large structures. Still, the windage and snow load turn out to be large and it is better to play it safe by making a safety margin than to do everything all over again.
Photo ideas


The canopy over the porch is not only over the front door, but also over the terrace too

Wooden canopy over the entrance in the form of a house - options with support pillars under the tiles

Awnings and canopies perform three main functions, on the basis of which the type of canopy, its shape, size, type of construction, method of fastening, materials for manufacturing and installation location are selected.
- protection from precipitation, and in winter also from icicles;
- providing shade.
- decorating the exterior of the house.
The canopy is also a design element that gives the structure a finished and attractive look. Therefore, it must be in harmony with the rest of the building and fit into the overall exterior. It would look ridiculous, say, a “antique” wooden product on an ultra-modern cottage.
When choosing the type of canopy, you need to take into account all the design features of the canopy and the appearance of the house, and you also need to know what types of canopies there are and how they differ from each other.
It’s the same story with a canopy, except that sometimes it can stand alone, for example, covering a car parking lot.
What does the visor consist of?
The visor design requires the following components:
According to its design features, the visor device can be modular or monolithic.
Modular canopy
It is distinguished by its simplicity and ease of design. Installing the canopy will not take more than an hour, as will its dismantling. Modular visors have a number of advantages:
- possibility of replacing individual components;
- simple production and installation of visors - you can do everything yourself;
- a wide variety of shapes and colors;
- relatively low price;
The design of modular visors is shown in the photo (figure).

Glass or polymer plastic is used as a coating.
Monolithic design
Reinforced concrete canopies are particularly durable. They are an inseparable part of the structure, which, on the one hand, has a beneficial effect on its strength, and on the other hand, on the complexity of reconstruction and repair.
Not only a canopy made of concrete slabs can be monolithic. The main thing is that the structure is inseparable from the walls of the house. For example, wooden cottages are equipped with canopies made of solid wood, and country houses are equipped with metal canopies.
There are also hybrid types of canopies that combine the reliability and strength of monolithic products with the ease of modular ones.
Materials for canopies and awnings
The quality of a product largely depends on the material from which its lining is made. The most popular canopy options are:
Beautiful glass canopies - stylish, durable material. The glass has a three-layer structure: the outer two layers are tempered or heat-strengthened glass. The inner layer is a transparent polymer film, which in case of damage prevents the formation of dangerous fragments and maintains the integrity of the damaged element.
The thickness of the flooring ranges from 1.2 cm to 3 cm. Along with ordinary glass, tinted or matte coatings are widely used.
All-glass visors have the only drawback: they are expensive. Therefore, glass canopies are usually small and are installed where the appearance of the product plays an important role, for example, above shops. You won't see the canopy over the basement entrance.
Polycarbonate . Canopies over the entrance made of polycarbonate have an attractive appearance and are much cheaper than their counterparts. Polymer plastic is a transparent material that transmits enough light, but at the same time blocks most of the ultraviolet radiation. There are two types:
- monolithic polycarbonate. The most durable known transparent building materials. Resistant to aggressive factors, yet flexible and easy to process;
- cellular or cellular polycarbonate. It consists of two thin sheets, between which there are connecting partitions. Very light (15 times lighter than glass) and at the same time durable material. Has good heat-insulating properties.
Polycarbonate visors are perhaps the most popular product on the domestic market. This is explained by the fact that the cost of the product is low, and its service life, in theory, exceeds 20-25 years.
Tree - natural lightweight material, easy to process. But at the same time it quickly deteriorates under the influence of moisture and sunlight. These shortcomings are partially eliminated by pre-treatment of wood: drying, impregnation with special compounds, varnishing, painting. After such preparation, wooden canopies last much longer, but over time they still become unusable and require replacement.
The wood is perfect for making a garden pavilion, gazebo or awning. You can also make a wooden canopy over the door leading into the house, basement or barn.
Metal - the most common material for building sheds, reliable and durable. According to the manufacturing method, there are prefabricated, welded, forged canopies and canopies. To construct a metal frame, as a rule, stainless steel is used, and galvanized iron or corrugated sheeting is used for cladding.
Canopies made of metal tiles are very popular due to the properties of this roofing material: light weight, durability, environmental friendliness, fire safety, corrosion resistance and pleasant appearance.
Installation of a canopy made of metal tiles is easy and without the use of special tools. Maintenance is minimal and does not require a lot of time or money.
If you decide to lay the flooring yourself, remember that improperly laid sheets of metal tiles can create noise during strong winds and allow water to pass through during precipitation. Poor quality coating contributes to the appearance of rust.
Concrete canopy - monolithic design. Reinforced concrete canopies are constructed simultaneously with the building and, as a rule, have massive dimensions. An excellent example is the canopy over the entrance to a residential building.
Shapes of canopies and canopies
There are seven basic configurations and shapes. Let's look at each in more detail.
- Shed with pitched roof. The cheapest and easiest to install types of visors, which is why they have gained their popularity. They come with a valance.


- Gable visor. It has a more complex design, but better protects against slanting rain and is easier to clear from snow. The frame is more rigid, so the canopy better withstands gusts of wind.

- The dome-shaped canopy looks great and protects from precipitation. However, due to the large number of rounded parts of complex shape, it is quite difficult to manufacture.


- Arched visor. A canopy of this type will fit into the design of any building and provide excellent protection from rain and snow.


- Straight with valance. An ideal visor option in terms of price-quality ratio. The traditional design of the product will allow it to fit into any architectural structure.

- Marquise. The interesting shape of the canopy provides endless possibilities for experimentation. Often used as a roof for going down to the basement.

- Concave design -

Attaching the canopy to the wall
Depending on the method of fastening the frame, the following types of canopies are distinguished:
- Canopies (hanging);
- On supports.
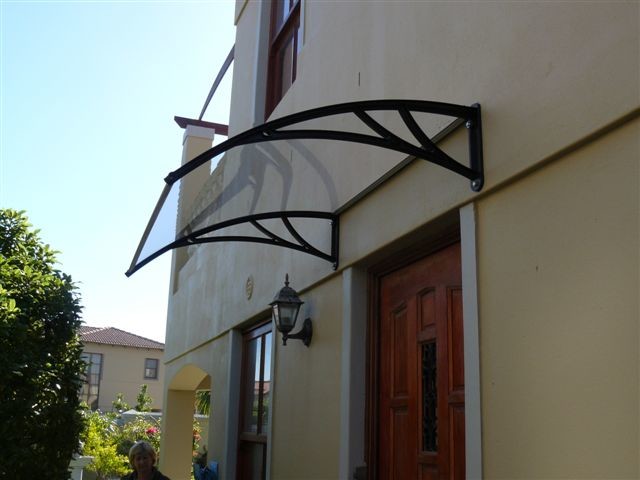
Hanging canopies - cantilever canopies
The cantilever canopy is mounted only on the wall and has two points of contact with the facade. The first is the rib of the structure, the second is the fastener for the pendants. Cantilever awnings are made from lightweight materials, for obvious reasons.
Frame with supports
The racks help to withstand the weight of the structure by redistributing the weight to the base, if the canopy is supported by vertical racks, or to the facade, if the supports are fixed to the wall.
These types of awnings can reach enormous sizes, covering the area in front of the garage or the entire terrace. The supports are made of massive wooden beams or profile pipes with a cross-section of 6-8 cm, which allows them to withstand heavy loads.
Classification by purpose
Depending on the purpose of the product, choose its shape, number of slopes and other design features. Let's look at where canopies are used and which canopy option is best to choose in this or that case.
Canopy over the entrance to the entrance
The canopy over the entrance consists of one or more monolithic slabs laid above the entrance. It is installed directly during the construction of the building and is an integral part of the house. There are both positive and negative aspects associated with this.
Like any concrete product, entrance canopies are particularly strong and durable. High-quality reinforced concrete canopies last at least 50 years.
At the same time, repairing such objects is extremely difficult, due to the characteristics of the material, and sometimes simply impossible. This and the difficulty of working with concrete determines the low popularity of products among private housebuilders. More and more people are choosing lightweight visors made from modern materials.
Canopy over basement
Many house designs include access to the basement from the street rather than from inside the house. There are several reasons for this. Firstly, the basement, as a rule, is an unheated room, the connection with which adversely affects the microclimate of the first floor. Secondly, if the basement is equipped as a workshop, then the absence of an internal connection to the house will significantly improve sound insulation.
So if you use the basement as a storage room for storing supplies or a workshop and do not want to create a lot of noise and inconvenience for your roommates, then entering the basement from the street is just for you.
To prevent rain from flooding the ground floor and the basement stairs from being covered with snow, a roof should be made over the entrance to the basement. The frame can be made of metal or wood; take what best suits the facade of the house. We choose the covering of the canopy in the same way; a canopy made of corrugated sheets, matched to the color of the roof of the house, or universal cellular polycarbonate will look good.
Canopy over the store
The most important thing is that the product turns out beautiful and protects the entrance from precipitation. For boutiques, as a rule, a cantilever canopy made of glass or monolithic polycarbonate is installed. The lightweight hanging structure will not distract attention from the store’s stained glass windows, and the absence of support pillars is favorable to this.
Ordinary shops located on the first floors of houses, on the contrary, are equipped with large, visible canopies, on which signs with the name of the shop are often placed.
Canopy over garage door
Garage canopies perfectly protect gates, locks and the surrounding area from precipitation and prevent premature damage to the facade of the building. The frame is made of metal, and it is best to use a metal profile, slate sheets or polymer plastic as a covering.
Canopy over the gate
A canopy over the gate is a very useful thing: it will hide your guest from the rain, who got completely wet while waiting for the owner, mark the place of the door and complement the design of the entrance group. In addition, the canopy over the front door will protect the bell button and intercom from moisture, which are extremely undesirable to get into.
A canopy in the courtyard of a private house is a structure that allows you to solve practical problems. A roof on supports will protect the recreation area from the scorching rays of the sun and rain, a canopy from the gate to the house itself will once and for all solve the problem of clearing the main path after snowfalls, and a covered structure attached to the bathhouse will solve the problem of storing firewood.
Canopy for a private house made of polycarbonate
Regardless of their purpose, sheds are built according to the same principle: supports are installed and the roof is mounted. Depending on the design, the following types of canopies are distinguished::
- canopy - the long side of the canopy is fixed to the wall of the structure;
- canopy-extension - one of the sides of the roof is attached to the wall, the rest is supported by support pillars;
- a free-standing structure - only pillars serve as supports; a canopy of this design can be installed close to the house to make an extension without loading the wall.
To build an aesthetic and functional canopy in the courtyard of a private house with your own hands, you need to think through the project well and choose suitable materials. Numerous photos that can be found on the Internet will help you choose the appropriate design option.
Project preparation and selection of materials
First of all, you need to decide where the canopy will be located and what function it will perform. For example, a canopy in front of the entrance to a private house, depending on the size and configuration, can:
- protect the porch from precipitation;
- play the role of a terrace located along the wall of the house;
- protect the path from the gate from precipitation.
A canopy-terrace attached to a house does not have to be located along the same wall as the main entrance to the house. Typically, such structures are built on the south side so that you can spend more time in comfortable conditions.
 Extension in the form of a terrace on supports made of metal profiles
 Vertical supports. For their manufacture, timber or logs, metal and forged racks can be used. This depends on the chosen design of the structure, its size and planned loads. Supports on the ground can also be pillars made of brick or stone, or concrete columns lined with any suitable material.
Supports on the wall. The principle of attaching the edge of the roof to the wall depends on the design and characteristics of the attached canopy. Horizontal supports are used (a beam or a piece of metal profile is attached to the wall) and brackets.
Rafter system. The material of manufacture may not be the same as that from which the supports are made. Wood or metal profile pipes are predominantly used, which make it possible to construct roofs with curved surfaces.
Roofing material. The same one can be used as on the roof of the house. For a canopy over the entrance to a house or a roof protecting the path leading to it, transparent polycarbonate is suitable - such a design will not clutter up the space. It is better to equip a canopy-terrace with an opaque roof or a matte polycarbonate roof, so that the place to relax is comfortable in the heat.
One of the points that you should pay attention to at the design stage is the angle of the roof.. An extension with a flat roof, capable of withstanding increased loads, can be used as a two-level terrace - a convenient ladder is installed to climb to its roof.
 Two-level usable terrace
 A flat roof should be sloped away from the house to prevent moisture from accumulating at the junction of the wall and the attached structure. If you plan to make a usable roof, the slope of the slope should be 3-5°. For a regular pitched roof the figure is 10-15°.
Arched structures and roofs of complex shapes are calculated individually, and the preparation of the project should be entrusted to professionals. Errors in calculations can lead to the fact that the canopy cannot withstand the loads and collapses.
Site preparation
Since the area under the canopy will be actively used, it is necessary to replace the soil on it with a durable and aesthetic coating. This could be concrete, paving slabs, paving stones, wood flooring, etc. In all cases, it is first necessary to prepare a pit with a tightly compacted sand cushion 10 cm thick.
It is recommended at the design stage to “link” the principle of installation of support posts to the selected type of coating.
Sometimes wooden supports can be installed on a pre-assembled deck or terrace board - this looks aesthetically pleasing and protects the lower part of the columns from rotting in the ground. The flooring can be raised above the ground, while steps are provided for the entrance, and the end part is covered with boards or decorative panels. It is important to provide ventilation for the space under the flooring so that its supporting frame does not begin to rot..
 Adjustable supports for wooden flooring
 Stone or brick pillars are usually erected before finishing the surface of the site itself. The pillars can be connected with parapets, visually separating the recreation area. You can use precast or monolithic concrete, followed by finishing with decorative stone or other materials. The area is paved with tiles, stone mosaics, paving stones, etc.
Metal supports from a profile pipe can be concreted in the ground, or attached with anchor bolts to a concrete platform or even to a parapet made of concrete, brick or blocks. The procedure for constructing a canopy depends on the choice of technology.. Racks made of metal profiles go well with a platform finished with tiles or paving stones. If the flooring is wooden and you want to make the appearance of the canopy more harmonious, the metal posts are painted in a suitable color or even hidden in a box made of boards, imitating wooden supports.
Examples of successful solutions in the design of areas under canopies can be found in the photo.


Wall support
If the canopy rests on one side of the wall, its roof is usually a shed or semi-arched structure. You can also mount the roof in the form of part of a cone or hemisphere, but this is a task for professionals.
Consider the simplest option: a wooden canopy for a house with a pitched roof. In this case, a hanging beam is attached to the wall. The height of its installation depends on the following factors:
- slope angle + height of vertical supports on the opposite side;
- the presence of a roof overhang on a given wall - for a one-story house this limits the height of the extension.
If the beam is mounted under the overhang of the roof of the house, it is important to leave a gap of suitable dimensions for mounting the junction of the canopy roofing system to the wall.
 Attaching the rafter to the wall support
 The beam is attached to the wall using anchor bolts or using special shaped metal holders with holes for fasteners. Subsequently, the beam serves as a support for the upper part of the rafter legs. Additionally, wooden brackets can be installed under the beam, securing them to the wall. Supports with braces will increase the load-bearing capacity of the structure. For their manufacture, timber of a suitable cross-section is used.
Support pillars
If you are installing a structure made of wood or metal profiles with your own hands and installing pillars in the ground, the work technology is as follows:
- holes for supports are being prepared;
- a layer of sand and crushed stone (about 20 cm) is laid and compacted at the bottom;
- a small amount of concrete mixture is poured and a support is installed;
- After leveling the support vertically using a level, concrete is poured into the hole to the top (it will take about 7 days for the concrete to gain strength).
Both metal and wood should be pre-treated so that the material is not damaged by moisture. Bitumen mastic is suitable for these purposes.
 Laying a metal profile post
 The supports can also be mounted on a ready-made site:
- A mounting plate is welded to the profile pipe, the metal is primed with an anti-corrosion compound and painted. Through holes in the plate, the support is attached to the concrete or tile surface using anchors.
- Wooden supports can be attached to a finished flooring made of deck boards using special metal bearings with a thick leg, which are screwed into the wooden covering.
Before installing the rafter system, it is necessary to check the height of all supports - it must correspond to the design parameters in order to maintain the correct angle of the roof and avoid distortions.
Rafter system
The supports should be connected to each other for structural rigidity. If the canopy near the house rests on a wall, the outer vertical supports and the hanging beam are connected by purlins, and the support pillars are connected by a load-bearing beam.
If the structure next to the house does not rest on the wall, load-bearing beams are laid on both sides, and the outer supports located opposite each other are connected by jumpers made of boards.
When erecting a canopy made of wood, the load-bearing beam can be further strengthened by installing braces from timber of the same section as the pillars.
Fastening the load-bearing beam to the supports is done in one of the following ways::
- The beam is placed on top and fixed with long-length self-tapping screws (vertically and at an angle) or metal plates.
- If the supporting beam is made of a rectangular beam placed on a narrow edge, a groove can be cut into the pillars for it (the width of the pillar must exceed the thickness of the beam by at least 10 cm).
- Thick boards are fastened on both sides of the column with the edge up - in terms of load-bearing capacity, such a structure is not inferior to a beam made of timber, and at the same time it will be cheaper.
At the next stage, the sheathing is installed. Beams or boards (flat) under an opaque roof can be placed on top of the supporting beams or secured end-to-end using metal fastening holders.
 Installation of sheathing
 But a wooden canopy for the house looks more impressive and stylish if the support for the polycarbonate matte roof is thick boards, fixed edge up. Curly cuts can be made on the edges of the boards that form the roof overhang.
If a canopy for a house is built with your own hands from metal structures, the elements of the rafter system are secured by welding or using bolts.
Roof
Installation of roofing decking is carried out using technology corresponding to the selected type of covering. If a decision is made to build an opaque canopy, a layer of waterproofing material is placed on the sheathing (if provided for in the installation instructions for the roofing material), a sealed joint is made between the wall and the canopy, and only then the roofing material is laid.
 Flexible tile covering
 Polycarbonate is attached using special profiles so that the joints of the sheets fit onto the sheathing. It is recommended to fill the gap between the outer profile and the wall with sealant for external use.
When designing a canopy, you need to think about where the water from the roof will flow? If the entrance to the canopy is located from the bottom of the slope, you cannot do without installing a drain to drain away precipitation.
Construction of a canopy will help improve your yard, make it more beautiful and comfortable.
A year after building the house, I wanted to attach a canopy to its front wall. So that it is functional, but at the same time very simple in design. What was required from the canopy? The most important thing is that thanks to it I wanted to get an additional place for summer relaxation, protected from sunlight and rain. For outdoor gatherings, so you can have lunch in the courtyard and relax on a sun lounger. According to the project, the canopy was supposed to be a kind of replacement for an open gazebo, but with a simpler design. So that during construction a minimum of material resources and physical effort is spent.
Within 2 weeks the plan was implemented. Based on the acquired practical skills and knowledge, I would like to bring to your attention a report on the construction of the simplest classic canopy attached to a house.
The design chosen was standard for this type of canopy. This is simply a roof truss system on supports. The dimensions of the canopy in plan are 1.8 x 6 m, the height to the roof is 2.4 m. On one side, metal pillars (4 pieces along the facade) are used as a supporting element, on the other, a board screwed to the wall of the house. The roof covering is Ondura sheets (analogous to Ondulin, with larger sheet sizes). It is planned to install lattice bars between the pillars so that you can sit in the shade under a canopy, enjoying nature and fresh air, even in the midday heat.
So, I’ll start the story about how this idea was realized. I hope I can clearly describe the whole process.
Step #1 – installation of metal poles
I started by installing metal pillars, that is, the vertical posts of the canopy, which will support the roof truss system. There are only 4 of them, they run along the facade, at a distance of 1.8 m from the wall. According to the plan, the length of the canopy is 6 m (along the entire length of the facade of the house), so the pitch of the racks is 1.8 m (taking into account the roof extensions on both sides of the racks).
For the racks, 4 steel pipes of 60x60x3 mm square section with a length of 3.9 m were purchased. They will be buried 1.5 m into the ground (below the freezing level), 2.4 m will remain on top. This will be the height of the canopy.
First, I marked with pegs the places where the posts should be installed - strictly at a distance of 1.8 m from the wall. I measured everything and calculated the horizontal lines. Then I took a drill with a 150 mm nozzle and drilled 4 holes 1.5 m deep.

According to the planned program, a concrete pile foundation will be poured under the racks. This is done as follows: each rack is installed in a pit into which concrete is poured. The result is reinforced piles holding the posts.
It is not advisable to pour concrete directly into drilled holes. It is necessary to make insulation, which will simultaneously serve as formwork. To do this, I decided to use roofing felt sleeves - sections of roofing felt rolled into a cylinder. The length of the sleeves should be such that the concrete piles protrude 10 cm above ground level. For a pit 1.5 m deep, at the bottom of which a 10 cm sand cushion will be poured, sleeves 1.5 m long are required. The diameter of the sleeves is 140 mm.
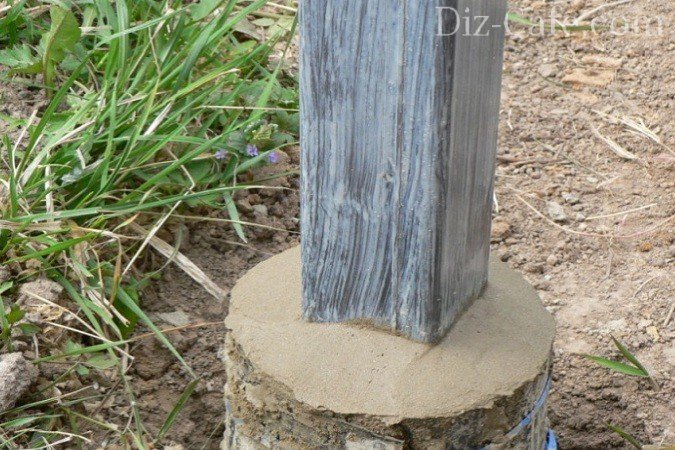
Concrete poured into roofing felt sleeves holds metal posts
I cut pieces of roofing felt, rolled them into sleeves and fastened them with tape (you can use a stapler). Next, a 10 cm layer of sand was poured into the bottom of each hole and a sleeve was inserted there. The concrete formwork is ready.
Metal stands were installed in the sleeves. First - the two outer ones, I aligned them vertically and height (2.4 m), pulled a cord between them and placed two intermediate posts along it. After which I poured concrete into the sleeves (from the ready-made mixture, just added water and that’s it - very convenient).

I allowed 3 days for the concrete to set and cure. It is not advisable to load the racks during this time, so I started preparing the wooden parts - support boards and rafters.
Material on how to build a terrace will also be useful:
Step #2 – making the roof
The roof structure includes 2 support boards on which the rafters and the entire roof structure will be supported. One of the boards is mounted on the wall, the other on posts. Rafters are laid on top of the support boards, in the transverse direction.
The boards were taken with a section of 150x50 mm, 6 m long. Since the canopy was originally planned as a solid but inexpensive structure, I bought unplaned boards. I planed and sanded them myself, which took some time. But I was confident in the result and smoothed the surface to the highest standard.
The rafters will be laid in the grooves of the support boards. Another headache - you need to cut the grooves, and at the angle of the rafters. To determine the angle and insertion locations, we had to perform a test installation of the boards. I screwed such a board to the wall with 140x8 mm wood grouse, and to the metal posts with 8 mm studs using washers and nuts.

Now that the support boards are in place, a small tool was used, with the help of which I determined the angle of inclination of the rafters. After which the boards were removed and grooves for the rafters were cut into them, taking into account a known angle.
The rafters are also made of boards 150x50 mm, 2 m long. There were 7 rafters in total. Their installation step on the support boards is 1 m.
After fitting the rafters to the grooves, all parts were painted with Holz Lazur JOBI glazing compound in teak color.
Then everything was installed. Support boards - as during preliminary fastening, that is, with the help of wood grouse and pins. The rafters were laid on top, in the grooves of the boards, and hammered in with nails. Each groove required 2 nails driven through the rafters obliquely, towards each other.

For the sheathing under Ondura we used 100x25 mm boards, 6 m long - 7 pieces. I screwed them across the rafters with self-tapping screws.

Ondura sheets are laid on the sheathing and nailed with rough nails with plastic caps to match the color of the flooring. In fact, the roof is already ready, now you don’t have to worry about rain and arrange a place under a canopy. For example, bring a garden table and chairs there.

Canopy covered with sheets of Euro slate Ondura
The ends of the rafters remained open, which is not very good in terms of decorativeness. And there was nowhere to attach the drain. Therefore, to complete the roof, I screwed a 6 m long frontal board - clapboard - to the ends of the rafters.

The front board covers the ends of the rafters and creates support for the gutter
The next stage is fixing the drain. Two 3-meter drains are mounted on the front board. The drainage from the roof goes into a watering pipe through which the grapes will be watered.
Step #3 – pouring the foundation for the mini-wall
To prevent water from getting under the canopy during rain, I decided to make a low brick retaining wall between the posts. It requires a strip foundation, which I made using standard technology. I dug a trench between the supports using the bayonet of a shovel and set out the formwork from the boards. I poured a 10 cm sand cushion at the bottom of the trench. And on top of it I placed 2 reinforcement bars on supports to fasten (reinforce) the foundation.
I was afraid to do it without reinforcement, you never know, it might crack and fall apart. Then he mixed the concrete and poured it into the trench. It was necessary to wait until the concrete set and hardened, so I decided to return to the supporting wall later. And now – start decorating your building.
Step #4 – installation of covers on posts and trellises
It's time to look at the canopy with a critical eye. The metal uprights of the canopy stood out a little from the overall composition. I decided to decorate and refine them by sewing them with wooden overlays. Just for this I have a few 100x25 mm boards left. I secured them on top of the metal posts using pieces of M8 studs, washers and nuts. There was space left between the overlays (on the side where the trellis was installed), so I inserted a 45x20 mm rail there. The slats formed protrusions; the horizontal elements of the trellis will be attached to them.

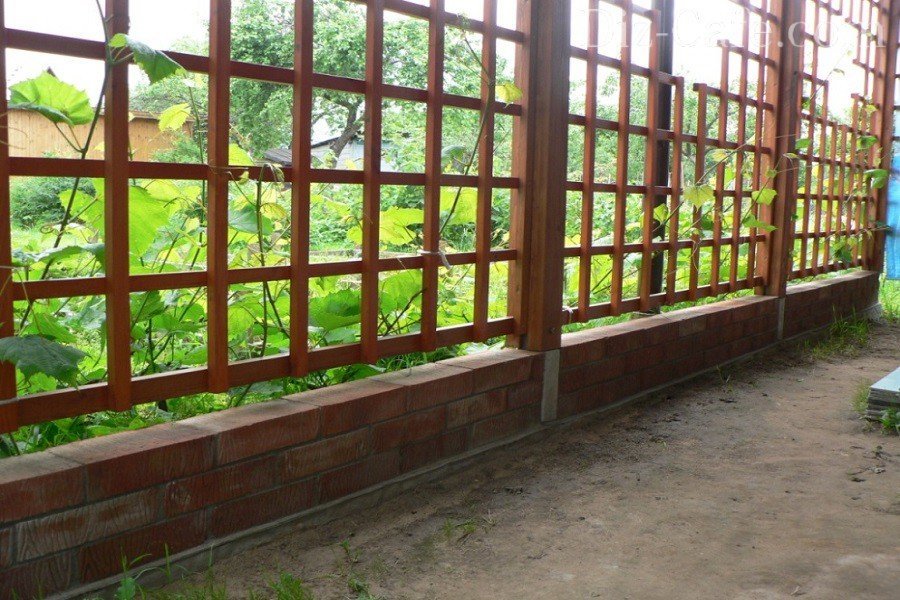
The time has come to attach the trellises. I chose a lattice pattern for them with a carved hole in the center. This hole allowed me to use not only long slats for the trellis, but also trimmings. We can say that it turned out to be a waste-free production. And this pattern looks more interesting than standard monotonous squares.
The slats for the trellises were made by longitudinally dissolving the 100x25mm boards I had. The board was split into three parts, and the resulting slats were sanded. The final cross-section of the slats (after grinding) is 30x20 mm.
I made the trellises without a frame; the slats are attached only to the vertical protrusions of the posts. At first, I set up horizontal slats, screwing them to the protrusions with self-tapping screws. Then, vertical slats were secured on top of them. The result was a decorative trellis, near which the wife planted grapes. Now it is already winding with might and main along the trellis and has almost blocked the wall of the structure. The shade protects from the midday heat. This is very useful, since the canopy is located on the south side of the house and without a canopy it was almost impossible to rest here during the day due to the abnormal heat.
Material on how to attach a veranda to a house will also be useful:

Trellis are assembled from slats directly “on site”

Step #5 - building a retaining wall
The last stage is the construction of a retaining wall. The strip foundation under it has already frozen, work can begin. For waterproofing, I glued 2 layers of roofing felt to the foundation tape, coating each layer with mastic. On top, along the roofing felt, I built a level retaining wall, 3 bricks high.
The retaining wall will not allow raindrops and water to fall onto the area under the canopy during irrigation.
Now there will be less dirt when watering and raining. And the canopy looks much nicer this way.

That's probably all. The shed was built. I implemented the entire project alone, but I did not notice any difficulties in the process. Subsequently, the area under the canopy was covered with paving slabs. You can say that I have a covered terrace or an open gazebo - whatever you like, call it that. Although in terms of design, this is an ordinary canopy on poles, the construction of which took very little time.
We all know very well that theater begins in the hangers (wardrobe), but in a private house this function is performed by the canopy. With this classic element you can not only protect the entrance to your house, but also give your country mansion a beautiful and original look.
Design options
The photo shows a design option for the porch. A canopy over the front door (pictured) can be made not only by professional engineers, but also by novice builders.
Advice! Before you start building a porch, think about what materials are best to use so as not to disrupt the style of the entire structure.
What should a modern canopy look like over the porch of a private house? The design option depends on the taste preferences of the home owner, as well as on what material was used in the construction of the building.
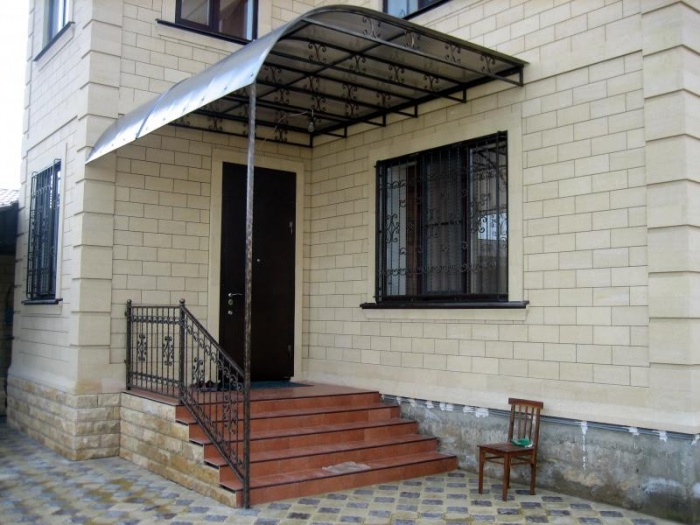
In any case, the porch must have a canopy that would protect it from the negative effects of natural conditions (rain, snow, hail). The stylish and durable canopy shown in the photo will become a true decoration of the porch. How to choose the right materials for it?
Attention! Only durable and practical materials are suitable for the visor. Particular attention is paid to their long service life.
Action plan
In order to make a high-quality and reliable porch canopy, you need to follow a clear plan.
First step. First you need to choose the material from which you will create the porch canopy.
Advice! Give preference to materials that do not corrode. Aluminum alloys would be a good option. You can use them to create a structure for a canopy.
Canopy materials
There are many roofing materials offered on the modern construction market; you just need to carefully read their main technical characteristics to find the ideal option for decorating your entrance to the house.
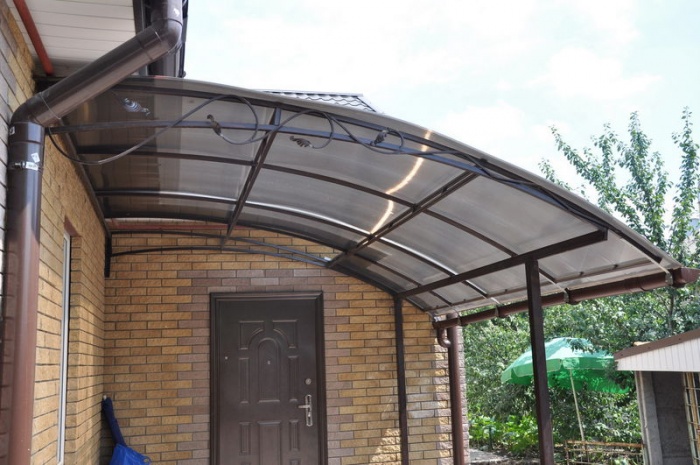
Polycarbonate
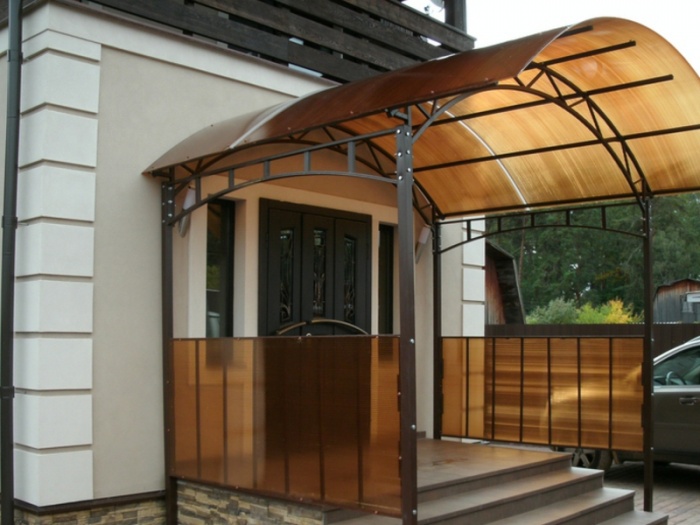
If you decide to use polycarbonate to cover the canopy, keep in mind that it will be inappropriate for a wooden house. Polycarbonate goes well with a metal frame; it is suitable for brick and block structures. The demand for this material is explained by its excellent performance characteristics, as well as its excellent appearance.
Among the positive properties of such a modern material as polycarbonate, one can mention its plasticity. It is this physical property that allows you to create porch canopies of any geometric shape from polycarbonate. Note the high strength of this material to mechanical shock. If you make a polycarbonate canopy over the porch, the material will withstand heavy rain, hail, and heavy snowfall.
We will pay special attention to the excellent fire resistance of polycarbonate. Despite so many advantages, polycarbonate also has certain disadvantages. The material does not withstand ultraviolet irradiation.

If the coating does not have a protective layer, then two years after the start of operation, the polycarbonate will become cloudy and all the original aesthetic characteristics of this roofing material will be lost.
Metal sheets
The use of metal as a roofing covering is considered an acceptable (budget) option. But working with roofing metal requires certain skills. Among the advantages of this type of finishing, we highlight a long operational period and reliability. But metal sheets chosen as roofing will require additional protection against corrosion.
Advice! To decorate the visor, purchase alloys that have anti-corrosion characteristics.

Metal tiles
A distinctive feature of this roofing surface is its unique appearance. A canopy made of metal tiles will have an unlimited service life. Its installation can be completed even by those who do not yet have the necessary construction skills.

The list of positive characteristics of metal tiles can be supplemented by simple care of the finished coating. This material fits harmoniously into any design chosen for decorating the porch. Are there any disadvantages to this roofing material? The main disadvantages of tiles are the lack of sound insulation. All sounds of rain will be clearly audible on the porch. As the air temperature rises, the metal tiles heat up significantly.
Corrugated sheet
Working with this common roofing material is much easier than working with metal tiles. Its popularity can be explained by its reasonable cost and ease of installation. The finished structure has an aesthetic appearance and does not require additional painting. The main disadvantage of this roofing covering is the lack of resistance to mechanical damage.

Second step. Once you have decided on the source materials, you can move on to the next step, think over the design option, and also select the shape of the canopy for the porch. In order to solve such a complex problem, you can contact a professional designer. Interesting design options for visors are also presented in the video fragment
What parameters will influence the design option? First of all, it is important to decide on the installation method. For example, if your plans include creating a massive structure, you will need metal pipes or wooden beams to further strengthen it. The suspended structure does not need such support; you can limit yourself to fixing the frame on the wall.
When choosing the general style of this decorative and protective element, it is important to take into account the shape of the canopy used.
The flat version is considered the simplest. It is an open version of the canopy, which is capable of protecting the porch only from vertical flows of rain and snow. Considering that mostly snow and rain are always associated with gusts of wind, such a design can be considered as a decorative element.
Installing a gable canopy will be more difficult. With its help, you can protect the entrance to the house from rain and snowstorms, strong gusts of wind. To create such a structure, you can choose any materials that are corrosion resistant.

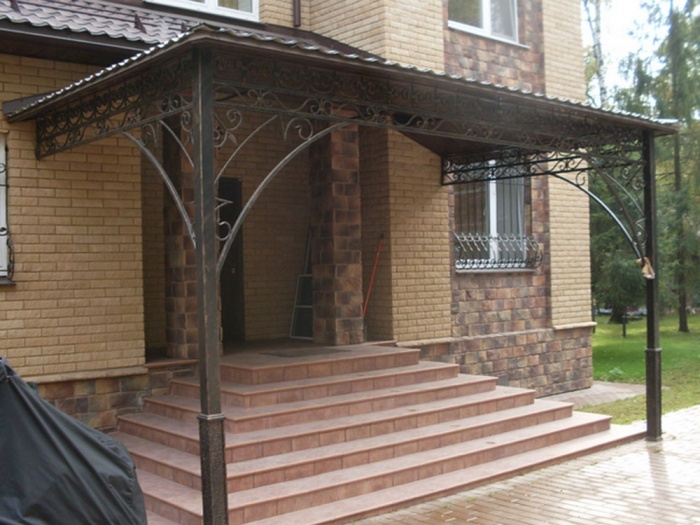
Three-pitch awnings are suitable for metal frames and are considered by professionals to be the most reliable and effective in use.
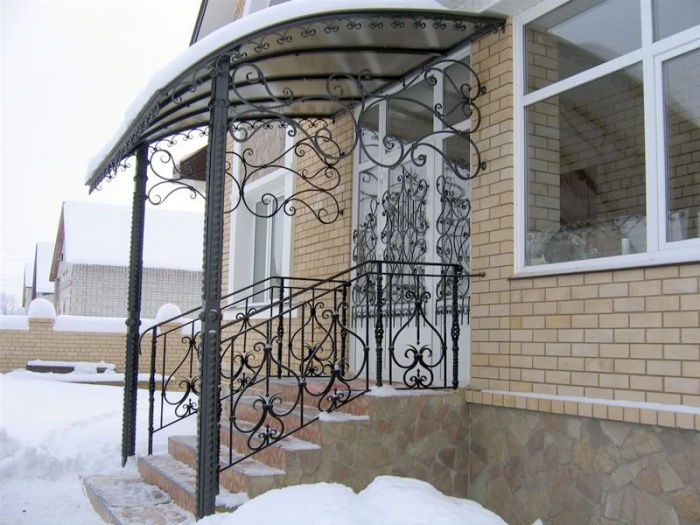
In order to give the porch a beautiful appearance, you can use artistic forging. This technique gives the product additional lightness and turns the porch into a real work of art. Exclusive forged canopies and canopies have a presentable appearance, so all the material and physical efforts spent on the construction of such a structure will be fully rewarded.
Whatever material the designers choose to decorate the entrance to the house, in addition to aesthetic characteristics, special attention is paid to its strength and reliability.
Conclusion
Currently, considerable attention is paid not only to the interior design of premises, but also to decorating the entrance to the house. When choosing an option for a canopy or canopy, be sure to think about whether the option you like will be combined with the house. If you make a metal entrance to a wooden house, the impression of the created image will be hopelessly spoiled.